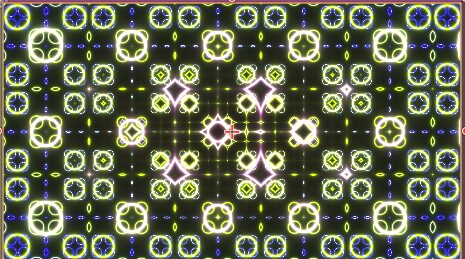
Fractal Study (original made by Kishimisu)
my first study of shaders
Shader code
shader_type canvas_item;
/*
------------------------------------------------------------------------------------------------------
This is a shader made using a tutorial found at (https://www.youtube.com/watch?v=f4s1h2YETNY).
the original fractal can be found at (https://www.shadertoy.com/view/mtyGWy)
this version was done as a hands on study of shaders and is not my creation.
all legal ownership of the design goes to Kishimisu.

DO NOT USE IT WITHOUT THEIR PERMISSION

the tutorial goes over loads stuff and is very beginner friendly. it was also made using the shadertoy
varient of GLSL. this showcase was an attempt at learning the ins and outs of
Godot's Shader Language (GDShader). Please feel free to look around, correct my mistakes
and/or study/modify it yourself. Ill leave notation where I think it's necessary.

My only personal request is that you dont use it in any commercial stuff seeing as this is a study
of someone else's creation.
---------------------------------------------------------------------------------------------------

last note before you scroll. All the uniforms were pushed out to the inspector by me...
the uniform presets were all numbers that were hardcoded in the tutorial. I deliberately pushed them
into the inspector for the sake of testing out alterations to the code to better understand it and
what it was doing. There will also be code that has been commented out. This code was done in the
tutorial as a means of teaching you how to get from Point A to Point B. I commented out the code vs
deleting because I felt was different enough that it could be used to get different effects.
there will be notation about it as it appears.

*/

uniform float sine_mod = 8.0;
uniform float sine_mod2 = 8.0;
/*
these smoothsteps were part of the commented out smoothstep action below. if you choose to uncomment
the smoothstep below... uncomment these along with it to get the proper effect.
*/
//uniform float smoothstep_min = 0.0;
//uniform float smoothstep_max = 0.1;

uniform float Inverse_modifier = 0.01;
uniform float Fractal_Scale = 1.5;
uniform float Iteration_Count = 4.0;
uniform float Time_Scale = 0.4;
uniform float Color_Offset = 0.4;
uniform float Power_Intensity = 1.2;

uniform float Red_Offset : hint_range(-3.142, 3.138) = 0.5;
uniform float Red_Ampl : hint_range(-3.142, 3.138) = 0.5;
uniform float Red_Freq : hint_range(-3.142, 3.138) = 1.0;
uniform float Red_Phase : hint_range(-3.142, 3.138) = 0.263;

uniform float Green_Offset : hint_range(-3.142, 3.138) = 0.5;
uniform float Green_Ampl : hint_range(-3.142, 3.138) = 0.5;
uniform float Green_Freq : hint_range(-3.142, 3.138) = 1.0;
uniform float Green_Phase : hint_range(-3.142, 3.138) = 0.416;

uniform float Blue_Offset : hint_range(-3.142, 3.138) = 0.5;
uniform float Blue_Ampl : hint_range(-3.142, 3.138) = 0.5;
uniform float Blue_Freq : hint_range(-3.142, 3.138) = 1.0;
uniform float Blue_Phase : hint_range(-3.142, 3.138) = 0.557;

/*
(:3b:)
this function was references by someone else in code. it uses alot of math to define sinewaves
for the RBG channels in vec3s and gives them a bunch of modifiers
(the uniforms for Offset, Ampletude, Frequency, and Phase). the explination for the math can be found
here (https://iquilezles.org/articles/palettes/). there is also a tool that can help visualize this
the video tutorial goes over how to use it. the tool is found here (https://dev.thi.ng/gradients/)

*/

vec3 Palette(float t)
{
	vec3 a = vec3 (Red_Offset, Green_Offset, Blue_Offset);
	vec3 b = vec3 (Red_Ampl, Green_Ampl, Blue_Ampl);
	vec3 c = vec3 (Red_Freq, Green_Freq, Blue_Freq);
	vec3 d = vec3 (Red_Phase, Green_Phase, Blue_Phase);


	return a + b * cos( 6.28318*(c*t*d) );
}

void fragment()
{
	vec2 Resolution = (1.0 / TEXTURE_PIXEL_SIZE); //canvas true resolution unnormalized(See ":1a:")

	vec2 uv = (UV * 2.0 - Resolution.xy); // UV coords of canvas that will be repeated in fractal
	vec2 uv2 = UV - 0.5; // UV Coords of Canvas that will remain unaltered

	uv.x *= Resolution.x / Resolution.y; //fixes warping on texture useing resolution (See ":1b:")

	/*
	(:1a:)
	A resolution vec2 was created to mimic "iResolution" from shadertoy using the offical converstion
	docs. the docs use "1.0 / SCREEN_PIXEL_SIZE" in place of iResolution, but after some digging i
	realized this was for the viewport resolution not the texture's resolution. So i swapped it to
	"1.0 / TEXTURE_PIXEL_SIZE" instead.

	(:1b:)
	im unsure if this even works, the idea was that no matter how the texture was warped or strech
	the shader would automatically fix any warping... it doesnt do this no matter how ive tried to.
	alter it. i thought that i might try and convert UV Coords to World Coords to get the desired
	effect, but never implamented it.

	*/

	vec3 Final_Color = vec3(0.0); //the color black used as an anchor color later in code

	for (float i = 0.0; i < Iteration_Count; i++) // iterates the code by the count in (int)
	{
		uv = fract(uv * Fractal_Scale) - 0.5; //coverts the normal UV map into a fractal uv map(See :2a:)
		/*
		(:2a:)
		the scale originally sat at 2.0 vs the 1.5 it does now this will show the fractal UV better.
		the UVs map to each repeated pattern inside each iteration of the fractal.bool

		(:2b:)
		the commented code below will alter the way the fractal plays out. they both create the
		float d which calculates the distance between the each fractals center and then
		alter it in different ways. try switching which one is commented out.

		*/

		//float d = length(uv); //(see :2b: above)
		float d = length(uv) * exp(-length(uv2)); //(see :2b: above)

		/*
		(:3a:)
		same thing as before, Color defines the color of the shader. the first one just changes the
		to red in code. the second one gives it wave efect. the third uncommented gives the rings
		a warping color effect. to understand the Pallete part, go look up at the Pallet function
		above i labled it (:3b:).

		*/

		//vec3 Color = vec3(1.0, 0.0, 0.0);//(see :3a: above)
		//vec3 Color = Palette(d + TIME);//(see :3a: above)
		vec3 Color = Palette(length(uv2) + i * Color_Offset + TIME * Time_Scale);//(see :3a: above)


		//d -= 0.5; //creates the fractal visual
		d = sin(d * sine_mod + TIME) / sine_mod2; // animates the fractal base on time (see :4:)
		/*
		(:4:)
		the side mode is what creates the rings the sine_mod alters the amount of rings.
		there was no offical explination for sine_mod2 so im not entirely sure what it alters,but
		from testing it seems to give the rings more thickness based on value. since it was never
		explained thats the only info i have.
		*/

		d = abs(d); //gives the rings an absolute value so that they dont just gradiate out infinitely

		/*
		(:5:)
		each version of the code below changes the way the ring is generated. the step gives it a
		hard edge. the smooth step allows for slight blur at the edges of the rings.
		the third one inverts the ring from being black to being white and the background to being black
		the fourth alters the intensity of the the glow of the rings.

		this also means that the ring creation is now controlled by code above.
		*/

		//d = step(0.1, d); //(see :5:)
		//d = smoothstep(smoothstep_min,smoothstep_max,d); //(see :5:)
		//d = Inverse_modifier / d; //(see :5:)
		d = pow(Inverse_modifier / d, Power_Intensity); //(see :5:)

		Final_Color += Color * d;
	}
	vec4 Coords = vec4(Final_Color, 1.0);
	COLOR = Coords;
}

void vertex()
{
	/*
	in shadertoy shader code, the coords are normalized with the bottom left being (0.0).
	this isnt true in godot. The top left is coord (0.0). This single vertex shader code
	flips the entire canvas on the y axis to simulate create the same effect of having (0,0) in
	the bottom left.
	*/
	VERTEX.y *= -1.0;

}