
VHS and CRT monitor effect
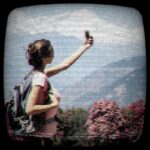
An effect to simulate a CRT monitor or an old TV. It also has settings to make it look like an old VHS recording (discolorations, noise, and rolling distortion, see image below).
This is a “true” CRT simulation with every scanline being divided into multiple sets of red, green, and blue squares – the technique called aperture grille.
It has many, many uniforms. I won’t list them all here but they include settings for scanlines, grille, pixels, discolorations, screen warping, noise, distortions, etc.
Important instructions
You can use the shader in two ways:
- To affect the node it is applied to, like a Sprite or ViewportContainer. Uncheck the Overlay parameter in the inspector.
- As an overlay filter to affect the nodes below it in the Scene hierarchy. Add the shader to a ColorRect and check the Overlay parameter in the inspector.
On Mac there is potentially a bug causing the Overlay check to not work properly. In that case, if you want to use the shader as an overlay, change overlay ? SCREEN_TEXTURE : TEXTURE to only SCREEN_TEXTURE on lines 129-140, and vec2 uv = overlay ? warp(SCREEN_UV) : warp(UV); to vec2 uv = warp(SCREEN_UV); on line 98.
Shader code
/*
Shader from Godot Shaders - the free shader library.
godotshaders.com/shader/VHS-and-CRT-monitor-effect

This shader is under CC0 license. Feel free to use, improve and
change this shader according to your needs and consider sharing
the modified result to godotshaders.com.
*/

shader_type canvas_item;

//*** IMPORTANT! ***/
// - If you are using this shader to affect the node it is applied to set 'overlay' to false (unchecked in the instepctor).
// - If you are using this shader as an overlay, and want the shader to affect the nodes below in the Scene hierarchy,
//   set 'overlay' to true (checked in the inspector).
// On Mac there is potentially a bug causing this to not work properly. If that is the case and you want to use the shader as an overlay
// change all "overlay ? SCREEN_TEXTURE : TEXTURE" to only "SCREEN_TEXTURE" on lines 129-140, and "vec2 uv = overlay ? warp(SCREEN_UV) : warp(UV);"
// to "vec2 uv = warp(SCREEN_UV);" on line 98.
uniform bool overlay = false;

uniform float scanlines_opacity : hint_range(0.0, 1.0) = 0.4;
uniform float scanlines_width : hint_range(0.0, 0.5) = 0.25;
uniform float grille_opacity : hint_range(0.0, 1.0) = 0.3;
uniform vec2 resolution = vec2(640.0, 480.0); // Set the number of rows and columns the texture will be divided in. Scanlines and grille will make a square based on these values

uniform bool pixelate = true; // Fill each square ("pixel") with a sampled color, creating a pixel look and a more accurate representation of how a CRT monitor would work.

uniform bool roll = true;
uniform float roll_speed = 8.0; // Positive values are down, negative are up
uniform float roll_size : hint_range(0.0, 100.0) = 15.0;
uniform float roll_variation : hint_range(0.1, 5.0) = 1.8; // This valie is not an exact science. You have to play around with the value to find a look you like. How this works is explained in the code below.
uniform float distort_intensity : hint_range(0.0, 0.2) = 0.05; // The distortion created by the rolling effect.

uniform float noise_opacity : hint_range(0.0, 1.0) = 0.4;
uniform float noise_speed = 5.0; // There is a movement in the noise pattern that can be hard to see first. This sets the speed of that movement.

uniform float static_noise_intensity : hint_range(0.0, 1.0) = 0.06;

uniform float aberration : hint_range(-1.0, 1.0) = 0.03; // Chromatic aberration, a distortion on each color channel.
uniform float brightness = 1.4; // When adding scanline gaps and grille the image can get very dark. Brightness tries to compensate for that.
uniform bool discolor = true; // Add a discolor effect simulating a VHS

uniform float warp_amount :hint_range(0.0, 5.0) = 1.0; // Warp the texture edges simulating the curved glass of a CRT monitor or old TV.
uniform bool clip_warp = false;

uniform float vignette_intensity = 0.4; // Size of the vignette, how far towards the middle it should go.
uniform float vignette_opacity : hint_range(0.0, 1.0) = 0.5;

// Used by the noise functin to generate a pseudo random value between 0.0 and 1.0
vec2 random(vec2 uv){
    uv = vec2( dot(uv, vec2(127.1,311.7) ),
               dot(uv, vec2(269.5,183.3) ) );
    return -1.0 + 2.0 * fract(sin(uv) * 43758.5453123);
}

// Generate a Perlin noise used by the distortion effects
float noise(vec2 uv) {
    vec2 uv_index = floor(uv);
    vec2 uv_fract = fract(uv);

    vec2 blur = smoothstep(0.0, 1.0, uv_fract);

    return mix( mix( dot( random(uv_index + vec2(0.0,0.0) ), uv_fract - vec2(0.0,0.0) ),
                     dot( random(uv_index + vec2(1.0,0.0) ), uv_fract - vec2(1.0,0.0) ), blur.x),
                mix( dot( random(uv_index + vec2(0.0,1.0) ), uv_fract - vec2(0.0,1.0) ),
                     dot( random(uv_index + vec2(1.0,1.0) ), uv_fract - vec2(1.0,1.0) ), blur.x), blur.y) * 0.5 + 0.5;
}

// Takes in the UV and warps the edges, creating the spherized effect
vec2 warp(vec2 uv){
	vec2 delta = uv - 0.5;
	float delta2 = dot(delta.xy, delta.xy);
	float delta4 = delta2 * delta2;
	float delta_offset = delta4 * warp_amount;

	return uv + delta * delta_offset;
}

// Adds a black border to hide stretched pixel created by the warp effect
float border (vec2 uv){
	float radius = min(warp_amount, 0.08);
	radius = max(min(min(abs(radius * 2.0), abs(1.0)), abs(1.0)), 1e-5);
	vec2 abs_uv = abs(uv * 2.0 - 1.0) - vec2(1.0, 1.0) + radius;
	float dist = length(max(vec2(0.0), abs_uv)) / radius;
	float square = smoothstep(0.96, 1.0, dist);
	return clamp(1.0 - square, 0.0, 1.0);
}

// Adds a vignette shadow to the edges of the image
float vignette(vec2 uv){
	uv *= 1.0 - uv.xy;
	float vignette = uv.x * uv.y * 15.0;
	return pow(vignette, vignette_intensity * vignette_opacity);
}

void fragment()
{
	vec2 uv = overlay ? warp(SCREEN_UV) : warp(UV); // Warp the uv. uv will be used in most cases instead of UV to keep the warping
	vec2 text_uv = uv;
	vec2 roll_uv = vec2(0.0);
	float time = roll ? TIME : 0.0;


	// Pixelate the texture based on the given resolution.
	if (pixelate)
	{
		text_uv = ceil(uv * resolution) / resolution;
	}

	// Create the rolling effect. We need roll_line a bit later to make the noise effect.
	// That is why this runs if roll is true OR noise_opacity is over 0.
	float roll_line = 0.0;
	if (roll || noise_opacity > 0.0)
	{
		// Create the areas/lines where the texture will be distorted.
		roll_line = smoothstep(0.3, 0.9, sin(uv.y * roll_size - (time * roll_speed) ) );
		// Create more lines of a different size and apply to the first set of lines. This creates a bit of variation.
		roll_line *= roll_line * smoothstep(0.3, 0.9, sin(uv.y * roll_size * roll_variation - (time * roll_speed * roll_variation) ) );
		// Distort the UV where where the lines are
		roll_uv = vec2(( roll_line * distort_intensity * (1.-UV.x)), 0.0);
	}

	vec4 text;
	if (roll)
	{
		// If roll is true distort the texture with roll_uv. The texture is split up into RGB to
		// make some chromatic aberration. We apply the aberration to the red and green channels accorging to the aberration parameter
		// and intensify it a bit in the roll distortion.
		text.r = texture(SCREEN_TEXTURE, text_uv + roll_uv * 0.8 + vec2(aberration, 0.0) * .1).r;
		text.g = texture(SCREEN_TEXTURE, text_uv + roll_uv * 1.2 - vec2(aberration, 0.0) * .1 ).g;
		text.b = texture(SCREEN_TEXTURE, text_uv + roll_uv).b;
		text.a = 1.0;
	}
	else
	{
		// If roll is false only apply the aberration without any distorion. The aberration values are very small so the .1 is only
		// to make the slider in the Inspector less sensitive.
		text.r = texture(SCREEN_TEXTURE, text_uv + vec2(aberration, 0.0) * .1).r;
		text.g = texture(SCREEN_TEXTURE, text_uv - vec2(aberration, 0.0) * .1).g;
		text.b = texture(SCREEN_TEXTURE, text_uv).b;
		text.a = 1.0;
	}

	float r = text.r;
	float g = text.g;
	float b = text.b;

	uv = warp(UV);

	// CRT monitors don't have pixels but groups of red, green and blue dots or lines, called grille. We isolate the texture's color channels
	// and divide it up in 3 offsetted lines to show the red, green and blue colors next to each other, with a small black gap between.
	if (grille_opacity > 0.0){

		float g_r = smoothstep(0.85, 0.95, abs(sin(uv.x * (resolution.x * 3.14159265))));
		r = mix(r, r * g_r, grille_opacity);

		float g_g = smoothstep(0.85, 0.95, abs(sin(1.05 + uv.x * (resolution.x * 3.14159265))));
		g = mix(g, g * g_g, grille_opacity);

		float b_b = smoothstep(0.85, 0.95, abs(sin(2.1 + uv.x * (resolution.x * 3.14159265))));
		b = mix(b, b * b_b, grille_opacity);

	}

	// Apply the grille to the texture's color channels and apply Brightness. Since the grille and the scanlines (below) make the image very dark you
	// can compensate by increasing the brightness.
	text.r = clamp(r * brightness, 0.0, 1.0);
	text.g = clamp(g * brightness, 0.0, 1.0);
	text.b = clamp(b * brightness, 0.0, 1.0);

	// Scanlines are the horizontal lines that make up the image on a CRT monitor.
	// Here we are actual setting the black gap between each line, which I guess is not the right definition of the word, but you get the idea
	float scanlines = 0.5;
	if (scanlines_opacity > 0.0)
	{
		// Same technique as above, create lines with sine and applying it to the texture. Smoothstep to allow setting the line size.
		scanlines = smoothstep(scanlines_width, scanlines_width + 0.5, abs(sin(uv.y * (resolution.y * 3.14159265))));
		text.rgb = mix(text.rgb, text.rgb * vec3(scanlines), scanlines_opacity);
	}

	// Apply the banded noise.
	if (noise_opacity > 0.0)
	{
		// Generate a noise pattern that is very stretched horizontally, and animate it with noise_speed
		float noise = smoothstep(0.4, 0.5, noise(uv * vec2(2.0, 200.0) + vec2(10.0, (TIME * (noise_speed))) ) );

		// We use roll_line (set above) to define how big the noise should be vertically (multiplying cuts off all black parts).
		// We also add in some basic noise with random() to break up the noise pattern above. The noise is sized according to
		// the resolution value set in the inspector. If you don't like this look you can
		// change "ceil(uv * resolution) / resolution" to only "uv" to make it less pixelated. Or multiply resolution with som value
		// greater than 1.0 to make them smaller.
		roll_line *= noise * scanlines * clamp(random((ceil(uv * resolution) / resolution) + vec2(TIME * 0.8, 0.0)).x + 0.8, 0.0, 1.0);
		// Add it to the texture based on noise_opacity
		text.rgb = clamp(mix(text.rgb, text.rgb + roll_line, noise_opacity), vec3(0.0), vec3(1.0));
	}

	// Apply static noise by generating it over the whole screen in the same way as above
	if (static_noise_intensity > 0.0)
	{
		text.rgb += clamp(random((ceil(uv * resolution) / resolution) + fract(TIME)).x, 0.0, 1.0) * static_noise_intensity;
	}

	// Apply a black border to hide imperfections caused by the warping.
	// Also apply the vignette
	text.rgb *= border(uv);
	text.rgb *= vignette(uv);
	// Hides the black border and make that area transparent. Good if you want to add the the texture on top an image of a TV or monitor.
	if (clip_warp)
	{
		text.a = border(uv);
	}

	// Apply discoloration to get a VHS look (lower saturation and higher contrast)
	// You can play with the values below or expose them in the Inspector.
	float saturation = 0.5;
	float contrast = 1.2;
	if (discolor)
	{
		// Saturation
		vec3 greyscale = vec3(text.r + text.g + text.b) / 3.;
		text.rgb = mix(text.rgb, greyscale, saturation);

		// Contrast
		float midpoint = pow(0.5, 2.2);
		text.rgb = (text.rgb - vec3(midpoint)) * contrast + midpoint;
	}

	COLOR = text;
}
Live Preview

Cool shader, but I can’t seem to get it to work. I applied it to a ViewportContainer with a Viewport as a child and a simple Spatial scene for testing as a child of that. The ViewportContainer also has a ShaderMaterial with this shader attached. This is all I see, both in editor and when I run the game. I must be doing something wrong, but I’m not sure what as I’ve used this setup for other effects like this and it’s worked fine.
Same effect for me.
I don’t know what is causing that to happen. I tested it now with a new scene with your setup: Node2D -> ViewportContainer -> Viewport -> Spatial -> MeshInstance | Camera | Environment. And then made a new ShaderMaterial and pasted the shader code, and it is working as expected. Could it be a GLES3/GLES2 thing? It’s only been tested on GLES3.
Well, that’s not the issue for me as I was using GLES3 to test it. I made a fresh scene with that exact same node setup and its just not working. I have tried saving the ShaderMaterial with the shader attached and in its own file too, but that didn’t fix the problem. Here’s what my editor looks like: https://imgur.com/JFdjKkV
Can you try to remove ‘ / fwidth(d) ‘ on line 79. Keep the rest on that line. Do you see an image now, with a blurry edge?
Sorry, line 76 🙂
I tried doing so, but no result. I’ve created a new project from scratch in case I’m messing up something. https://imgur.com/a/JU3fvN7
Edit: Btw thanks for taking the time to help us getting this sorted out, your shader looks amazing in the pictures 🙂
Thanks, I also want to understand why this is happening. I’m still learning shaders so if I am doing something wrong I want to know 🙂
Just to debug, can you try to remove everything that has to do with the border and the vignette. Remove all code on row 199-205.
https://imgur.com/sSCjSDs
Still no luck I’m afraid. https://imgur.com/a/COwSBRE
Did you try to put the shader on an empty new project with the same hierarchy we did? Maybe there’s something in the settings that you changed while working on the project and that’s why we are getting the white screen. Or maybe we are putting the shader on the wrong place or with the wrong material? I’m a total noob on shaders so maybe I’m totally wrong…
Yes, the setup is exactly the same. I’ve tried new scenes and new projects, both with GLES3 and GLES2. The shader is on the ViewportContainer.
I am getting this result when removing borders from the code, which is similar to what you are getting: https://imgur.com/a/kwKQfiW That’s why I thought it might have something to do with that.
Perhaps try to remove feature by feature in the code and see if something changes. Most features are contained in the if-statements, so you should be able to remove a whole if-block to remove a specific feature. On line 88 change the ‘vec4 text;’ to ‘ vec4 text = texture(TEXTURE, UV); ‘ first.
This may/may not help narrow it down, but this is definitely something wrong with Godot. I converted the shader to a ShaderToy shader, and it works fine on there with both images and video, as you can see here. If you want to try it for yourself, you can copy it from this pastebin link, go to the site, make a new shader, paste it in and choose any image/video input.
I just found the problematic lines: on lines 161 through 163, you clamp text.r, text.g, and text.b incorrectly by passing the range values first, like so:
I changed these to:
You made the same mistake when calling clamp again later, on line 188, you wrote:
Changing this to:
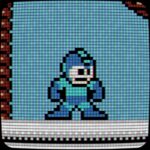
fixed the shader. I now see the image, as expected:
Used this shader in 2D with icon, and icon is now upside down.
If you’re using a Viewport node to display everything, click on the Viewport, and in the inspector, in the “Render Target” dropdown, check “V Flip”.
Thanks Zorochase!! That worked. Thanks also pend00 for your shader and your time 😀
OMG! I’m an idiot 😀 Thanks for clearing that out, I’ll change the code immediately! It’s weird that on my Mac there is no problem, but I tried it now on my PC and I get the same issue as you. Oh, well! While debugging now on the PC I found some places where I can optimize the code a bit as well, so that was good 🙂
For me, there still seems to be an issue with ‘fwidth’. I’ve updated the code with a new border function that doesn’t use fwidth.
Where did you put the shader? I’m having the same issue as Zorochase, with all i see is blank when I add the shader. https://imgur.com/a/KBeGxPz
Worked a treat. Added shader to ColorRect node as overlay and everything underneath treated to CRT goodness 🙂
Thanks alot for providing this awesome shader!
Now I can use it for my fantasy console, ConSoal!
This is a cool shader, but I can’t get the chromatic aberration to be relative to the texture’s resolution, regardless of how large it appears on the screen. I have the issue where the chromatic aberration is small when zoomed in, but extremely large when zoomed out.
What a cool shader! You made AMAZING job! In right hands it can make BEAUTIFUL results!
Thanks a lot wor your work!
How to remove onion thing:
https://imgur.com/a/XDbiJ7F
Change the Grille opacity to 0
hello, i have a problem with the shader, im using a ColorRect, but is flip down, turned head.
In case anyone else runs into this issue ~ turn on overlay in the Shader Param
This shader works amazing for me. Make sure to read his notes: he makes it clear how to solve the upside-down thing.
Some fun with this:
Made a “broken tv” function by adding this script to a ColorRect using the shader:
(TRIGGER/EPLIPSY WARNING: Very intense if you go crazy with the randi limits.
~~~
extends ColorRect
var _shader_rng = RandomNumberGenerator.new()
func _ready():
_shader_rng.randomize()
func _process(delta):
var _value = _shader_rng.randf_range(0.1,1.0)
self.material.set_shader_param(“roll_variation”,_value)
self.material.set_shader_param(“roll_speed”,_value)
self.material.set_shader_param(“roll_size”,_value)
~~~
Also, for variation each scene, with different scans per instance:
~~~
extends ColorRect
var _shader_rng = RandomNumberGenerator.new()
func _ready():
_shader_rng.randomize()
var _value = _shader_rng.randf_range(1.0,5.0)
self.material.set_shader_param(“roll_variation”,_value)
self.material.set_shader_param(“roll_speed”,_value)
self.material.set_shader_param(“roll_size”,_value)
~~~~
I tried adding it to a polygon 2d below the camera. I turned on “overlay” despite that it doesn’t work. Using Viewport works. But that invites problems with changing scenes.
Doesn’t work for me. It just covers the screen with the effects, but I cannot see the game itself. Reducing everything’s opacity to 0 leaves a simple gray screen.
https://vk.com/albums405998140?z=photo405998140_457246693%2Falbum405998140_00
Nevermind, I solved it by applying it to ColorRect instead of viewport container.
Thanks for the shader. It looks incredible :p
Any idea how to get this working in 4.0?!
One of the best shaders on the platform ~ mad respect ~ could we get this in a github repo? I’ve noticed a few little things (like aberration being -0.005 off) and it would be fantastic for anyone to come in and contribute
Is there an option that can turn the screen to grayscale?
Fantastic shader! Absolutely amazed at the quality.
I’m actually making a computer in 2d, The Shader’s working fine but all the buttons which I require for the Computer UI are not working when I hide the shader they are working fine. How do I fix this
If the shader is on a control node (like a color rect) make sure to set mouse_filter to “ignore”
OMG! It is exactly what I need for my game! Can I use it for commercial games?
For Godot 4, you just need to redefine SCREEN_TEXTURE. Put this in the beginning:
uniform sampler2D SCREEN_TEXTURE : hint_screen_texture, repeat_disable, filter_nearest;
While experimenting with this shader I found the best (I think so) resolution value according to your viewport size.
If
screen_sizeis viewport size, than resolution value will beVector2(screen_size.x/3.0, screen_size.y/1.5). Important: you should avoid integer division here.This ratio gives the the highest quality of scanlines (they’re all the same size) and grille (it perfectly divides image to three color channels).
thanks for this. i was wondering why the scanlines were rendered weirdly.
Is there a version of this that works with Godot 4? I’m trying to find a crt shader for my game and I can’t find any that work with Godot 4.
It’s working fine for me on Godot 4; you just have to add the line that the error recommends.
this is great, but it seems to cut off the edges of the image it’s modifying; is there any way to make it not do this?
Is it okay if I use this shader for a horror game? I’ll provide credit for the code used.
Working on godot 4, just add
uniform sampler2D SCREEN_TEXTURE : hint_screen_texture;
Somewhere in shader.
About applying:
Put in scene CanvasLayer, then put ColorRect on full screen in CanvasLayer. There we put a shader, and it works!
Demo screen
Thanks man
Cool effect at roll_size = 0, video starts to glitch on all screen after some time, controlled by roll_speed. And when roll_speed = 1, effect stops on some time…
Got this working on 4.1 at non-scaled resolution, but
viewportstretch mode (in Project Settings) messes up the effects.The RGB and scanlines disappear if Warp is set to 0. With warp at 0.01 or greater the dark lines of the effect are massive on screen, and so are the warped RGB lines if Grille is >0.
My viewport size in project settings is 320×240. One of the things I tried was increasing the resolution in the shader params to my display size (1920×1080) and setting warp to 0.001. That made the scanlines appear visible on the edges of the screen, but they are invisible at the center of the screen.
Any help is much appreciated!
I try to use this shader on 2 colorrect,but there is one wired problem.When I adding it to just one sigle colorrect,it works perfect,but as soon as I add it to another colorrect,the first one will turn transparent.It seems like 2 shader effect each other,is there anyone have save issue?
I’m Having the exact Same issue Right now
how can i change the chromatic aberration to orange and blue instead of green and pink?
Great shader! Thanks a lot.
Had to add the following line under shader_type cavas_item for Godot 4.1.3:
uniform sampler2D SCREEN_TEXTURE : hint_screen_texture, filter_linear_mipmap;
this is super cool and with a bit of tweaking works great for the effect I’m trying to achieve, thank you so much for taking time out of your day to make things like this
[…] two shaders and a font can make! The left-most image below shows what it looked like before I added this CRT monitor effect, this night vision effect, and this […]
Hello. Great job! Managed to connect everything (with a hint from Godot). Thank you very much.
I have a question. It would be very suitable for me to add a reduction in image fps to this shader. Is it possible to achieve a reduction in fps using some changes in the shader or additional manipulations? The option with a reduction in fps through “Engine.max_fps” is not suitable at all, the game physics starts to work poorly.
I love this shader and I love how much there is to customice and I love all the options and I love you!
For anyone in 2025, here’s updated code that should work.
/*
Shader from Godot Shaders – the free shader library.
godotshaders.com/shader/VHS-and-CRT-monitor-effect
This shader is under CC0 license. Feel free to use, improve and
change this shader according to your needs and consider sharing
the modified result to godotshaders.com.
*/
shader_type canvas_item;
//*** IMPORTANT! ***/
// – If you are using this shader to affect the node it is applied to set ‘overlay’ to false (unchecked in the instepctor).
// – If you are using this shader as an overlay, and want the shader to affect the nodes below in the Scene hierarchy,
// set ‘overlay’ to true (checked in the inspector).
// On Mac there is potentially a bug causing this to not work properly. If that is the case and you want to use the shader as an overlay
// change all “overlay ? SCREEN_TEXTURE : TEXTURE” to only “SCREEN_TEXTURE” on lines 129-140, and “vec2 uv = overlay ? warp(SCREEN_UV) : warp(UV);”
// to “vec2 uv = warp(SCREEN_UV);” on line 98.
uniform bool overlay = false;
uniform float scanlines_opacity : hint_range(0.0, 1.0) = 0.4;
uniform float scanlines_width : hint_range(0.0, 0.5) = 0.25;
uniform float grille_opacity : hint_range(0.0, 1.0) = 0.3;
uniform vec2 resolution = vec2(640.0, 480.0); // Set the number of rows and columns the texture will be divided in. Scanlines and grille will make a square based on these values
uniform bool pixelate = true; // Fill each square (“pixel”) with a sampled color, creating a pixel look and a more accurate representation of how a CRT monitor would work.
uniform bool roll = true;
uniform float roll_speed = 8.0; // Positive values are down, negative are up
uniform float roll_size : hint_range(0.0, 100.0) = 15.0;
uniform float roll_variation : hint_range(0.1, 5.0) = 1.8; // This valie is not an exact science. You have to play around with the value to find a look you like. How this works is explained in the code below.
uniform float distort_intensity : hint_range(0.0, 0.2) = 0.05; // The distortion created by the rolling effect.
uniform float noise_opacity : hint_range(0.0, 1.0) = 0.4;
uniform float noise_speed = 5.0; // There is a movement in the noise pattern that can be hard to see first. This sets the speed of that movement.
uniform float static_noise_intensity : hint_range(0.0, 1.0) = 0.06;
uniform float aberration : hint_range(-1.0, 1.0) = 0.03; // Chromatic aberration, a distortion on each color channel.
uniform float brightness = 1.4; // When adding scanline gaps and grille the image can get very dark. Brightness tries to compensate for that.
uniform bool discolor = true; // Add a discolor effect simulating a VHS
uniform float warp_amount :hint_range(0.0, 5.0) = 1.0; // Warp the texture edges simulating the curved glass of a CRT monitor or old TV.
uniform bool clip_warp = false;
uniform float vignette_intensity = 0.4; // Size of the vignette, how far towards the middle it should go.
uniform float vignette_opacity : hint_range(0.0, 1.0) = 0.5;
// Used by the noise functin to generate a pseudo random value between 0.0 and 1.0
vec2 random(vec2 uv){
uv = vec2( dot(uv, vec2(127.1,311.7) ),
dot(uv, vec2(269.5,183.3) ) );
return -1.0 + 2.0 * fract(sin(uv) * 43758.5453123);
}
// Generate a Perlin noise used by the distortion effects
float noise(vec2 uv) {
vec2 uv_index = floor(uv);
vec2 uv_fract = fract(uv);
vec2 blur = smoothstep(0.0, 1.0, uv_fract);
return mix( mix( dot( random(uv_index + vec2(0.0,0.0) ), uv_fract – vec2(0.0,0.0) ),
dot( random(uv_index + vec2(1.0,0.0) ), uv_fract – vec2(1.0,0.0) ), blur.x),
mix( dot( random(uv_index + vec2(0.0,1.0) ), uv_fract – vec2(0.0,1.0) ),
dot( random(uv_index + vec2(1.0,1.0) ), uv_fract – vec2(1.0,1.0) ), blur.x), blur.y) * 0.5 + 0.5;
}
// Takes in the UV and warps the edges, creating the spherized effect
vec2 warp(vec2 uv){
vec2 delta = uv – 0.5;
float delta2 = dot(delta.xy, delta.xy);
float delta4 = delta2 * delta2;
float delta_offset = delta4 * warp_amount;
return uv + delta * delta_offset;
}
// Adds a black border to hide stretched pixel created by the warp effect
float border (vec2 uv){
float radius = min(warp_amount, 0.08);
radius = max(min(min(abs(radius * 2.0), abs(1.0)), abs(1.0)), 1e-5);
vec2 abs_uv = abs(uv * 2.0 – 1.0) – vec2(1.0, 1.0) + radius;
float dist = length(max(vec2(0.0), abs_uv)) / radius;
float square = smoothstep(0.96, 1.0, dist);
return clamp(1.0 – square, 0.0, 1.0);
}
uniform sampler2D SCREEN_TEXTURE : hint_screen_texture, filter_linear_mipmap;
// Adds a vignette shadow to the edges of the image
float vignette(vec2 uv){
uv *= 1.0 – uv.xy;
float vignette = uv.x * uv.y * 15.0;
return pow(vignette, vignette_intensity * vignette_opacity);
}
void fragment()
{
vec2 uv = overlay ? warp(SCREEN_UV) : warp(UV); // Warp the uv. uv will be used in most cases instead of UV to keep the warping
vec2 text_uv = uv;
vec2 roll_uv = vec2(0.0);
float time = roll ? TIME : 0.0;
// Pixelate the texture based on the given resolution.
if (pixelate)
{
text_uv = ceil(uv * resolution) / resolution;
}
// Create the rolling effect. We need roll_line a bit later to make the noise effect.
// That is why this runs if roll is true OR noise_opacity is over 0.
float roll_line = 0.0;
if (roll || noise_opacity > 0.0)
{
// Create the areas/lines where the texture will be distorted.
roll_line = smoothstep(0.3, 0.9, sin(uv.y * roll_size – (time * roll_speed) ) );
// Create more lines of a different size and apply to the first set of lines. This creates a bit of variation.
roll_line *= roll_line * smoothstep(0.3, 0.9, sin(uv.y * roll_size * roll_variation – (time * roll_speed * roll_variation) ) );
// Distort the UV where where the lines are
roll_uv = vec2(( roll_line * distort_intensity * (1.-UV.x)), 0.0);
}
vec4 text;
if (roll)
{
// If roll is true distort the texture with roll_uv. The texture is split up into RGB to
// make some chromatic aberration. We apply the aberration to the red and green channels accorging to the aberration parameter
// and intensify it a bit in the roll distortion.
text.r = texture(SCREEN_TEXTURE, text_uv + roll_uv * 0.8 + vec2(aberration, 0.0) * .1).r;
text.g = texture(SCREEN_TEXTURE, text_uv + roll_uv * 1.2 – vec2(aberration, 0.0) * .1 ).g;
text.b = texture(SCREEN_TEXTURE, text_uv + roll_uv).b;
text.a = 1.0;
}
else
{
// If roll is false only apply the aberration without any distorion. The aberration values are very small so the .1 is only
// to make the slider in the Inspector less sensitive.
text.r = texture(SCREEN_TEXTURE, text_uv + vec2(aberration, 0.0) * .1).r;
text.g = texture(SCREEN_TEXTURE, text_uv – vec2(aberration, 0.0) * .1).g;
text.b = texture(SCREEN_TEXTURE, text_uv).b;
text.a = 1.0;
}
float r = text.r;
float g = text.g;
float b = text.b;
uv = warp(UV);
// CRT monitors don’t have pixels but groups of red, green and blue dots or lines, called grille. We isolate the texture’s color channels
// and divide it up in 3 offsetted lines to show the red, green and blue colors next to each other, with a small black gap between.
if (grille_opacity > 0.0){
float g_r = smoothstep(0.85, 0.95, abs(sin(uv.x * (resolution.x * 3.14159265))));
r = mix(r, r * g_r, grille_opacity);
float g_g = smoothstep(0.85, 0.95, abs(sin(1.05 + uv.x * (resolution.x * 3.14159265))));
g = mix(g, g * g_g, grille_opacity);
float b_b = smoothstep(0.85, 0.95, abs(sin(2.1 + uv.x * (resolution.x * 3.14159265))));
b = mix(b, b * b_b, grille_opacity);
}
// Apply the grille to the texture’s color channels and apply Brightness. Since the grille and the scanlines (below) make the image very dark you
// can compensate by increasing the brightness.
text.r = clamp(r * brightness, 0.0, 1.0);
text.g = clamp(g * brightness, 0.0, 1.0);
text.b = clamp(b * brightness, 0.0, 1.0);
// Scanlines are the horizontal lines that make up the image on a CRT monitor.
// Here we are actual setting the black gap between each line, which I guess is not the right definition of the word, but you get the idea
float scanlines = 0.5;
if (scanlines_opacity > 0.0)
{
// Same technique as above, create lines with sine and applying it to the texture. Smoothstep to allow setting the line size.
scanlines = smoothstep(scanlines_width, scanlines_width + 0.5, abs(sin(uv.y * (resolution.y * 3.14159265))));
text.rgb = mix(text.rgb, text.rgb * vec3(scanlines), scanlines_opacity);
}
// Apply the banded noise.
if (noise_opacity > 0.0)
{
// Generate a noise pattern that is very stretched horizontally, and animate it with noise_speed
float noise = smoothstep(0.4, 0.5, noise(uv * vec2(2.0, 200.0) + vec2(10.0, (TIME * (noise_speed))) ) );
// We use roll_line (set above) to define how big the noise should be vertically (multiplying cuts off all black parts).
// We also add in some basic noise with random() to break up the noise pattern above. The noise is sized according to
// the resolution value set in the inspector. If you don’t like this look you can
// change “ceil(uv * resolution) / resolution” to only “uv” to make it less pixelated. Or multiply resolution with som value
// greater than 1.0 to make them smaller.
roll_line *= noise * scanlines * clamp(random((ceil(uv * resolution) / resolution) + vec2(TIME * 0.8, 0.0)).x + 0.8, 0.0, 1.0);
// Add it to the texture based on noise_opacity
text.rgb = clamp(mix(text.rgb, text.rgb + roll_line, noise_opacity), vec3(0.0), vec3(1.0));
}
// Apply static noise by generating it over the whole screen in the same way as above
if (static_noise_intensity > 0.0)
{
text.rgb += clamp(random((ceil(uv * resolution) / resolution) + fract(TIME)).x, 0.0, 1.0) * static_noise_intensity;
}
// Apply a black border to hide imperfections caused by the warping.
// Also apply the vignette
text.rgb *= border(uv);
text.rgb *= vignette(uv);
// Hides the black border and make that area transparent. Good if you want to add the the texture on top an image of a TV or monitor.
if (clip_warp)
{
text.a = border(uv);
}
// Apply discoloration to get a VHS look (lower saturation and higher contrast)
// You can play with the values below or expose them in the Inspector.
float saturation = 0.5;
float contrast = 1.2;
if (discolor)
{
// Saturation
vec3 greyscale = vec3(text.r + text.g + text.b) / 3.;
text.rgb = mix(text.rgb, greyscale, saturation);
// Contrast
float midpoint = pow(0.5, 2.2);
text.rgb = (text.rgb – vec3(midpoint)) * contrast + midpoint;
}
COLOR = text;
}
U’re the goat
Thank you!
i want to layer a image over it but i wont go under ho do i do this?
— i found out how you just need to go to Layer in a CanvasLayer and make it -1
if you have an issue with : line 129
write under shader_type canvas_item; this uniformsampler2D screen_texture : hint_screen_texture, filter_linear_mipmap;
then change SCREEN_TEXTURE to screen_texture with a small letter .