Godot 4 Shader: Dual-Channel Overlay Effect for Dynamic Texturing
What This Shader Does
This Godot 4 CanvasItem shader applies three overlay textures based on the red, green, and blue color channels of the base texture or material.
- If the red channel (COLOR.r) is 1, the first overlay texture (overlay_tex_red) is applied.
- If the green channel (COLOR.g) is 1, the second overlay texture (overlay_tex_green) is applied.
- If the blue channel (COLOR.b) is 1, the third overlay texture (overlay_tex_blue) is applied.
- If none of these channels are 1, the original color remains unchanged.
This can be useful for dynamic texture effects such as:
- Layered texture blending (e.g., terrain transitions).
- Dynamic pixel-art effects that change based on color masks.
- Stylized rendering where specific colors drive different overlays.
How to Use It in Godot 4
1. Create a Shader Material
- Select a Sprite, TextureRect, or Control Node where you want to apply the shader.
- Go to the Material section and create a new ShaderMaterial.
- Assign this shader to the material.
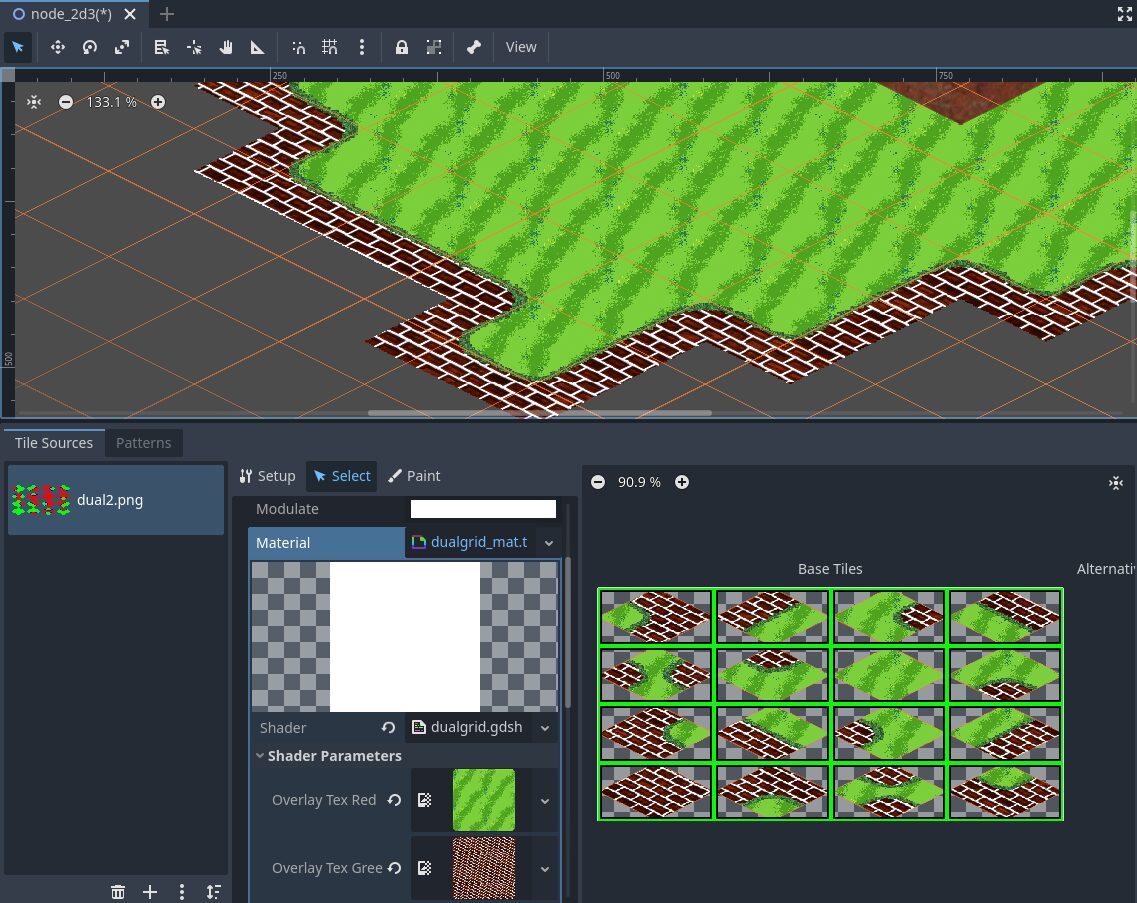
2. Add the Required Textures
In the Shader Parameters, assign three overlay textures:
- overlay_tex_red → Texture applied when COLOR.r = 1
- overlay_tex_green → Texture applied when COLOR.g = 1
- overlay_tex_blue → Texture applied when COLOR.b = 1
Adjust the scale values (scale_r, scale_g, scale_b) to control the tiling of each overlay texture.
3. Prepare the Base Texture
Your base texture should use the red, green, and blue channels as masks:
- Areas where red = 1 will show the first overlay.
- Areas where green = 1 will show the second overlay.
- Areas where blue = 1 will show the third overlay.
- Other areas will remain unchanged.
Example Use Case
Imagine a 2D game where different status effects change the character’s appearance:
- Fire effect → Red overlay adds a fire texture.
- Poison effect → Green overlay adds a toxic texture.
- Frozen effect → Blue overlay adds an icy texture.
- Multiple effects can blend dynamically based on the mask values.
Would you like help setting up a test scene in Godot 4? 🚀
Shader code
shader_type canvas_item;

uniform sampler2D overlay_tex_red : repeat_enable, filter_nearest;
uniform sampler2D overlay_tex_green : repeat_enable, filter_nearest;
uniform sampler2D overlay_tex_blue : repeat_enable, filter_nearest;

uniform vec2 scale_r = vec2(0.02, 0.02);
uniform float angle_r = 0.0;
uniform vec2 scale_g = vec2(0.02, 0.02);
uniform float angle_g = 0.0;
uniform vec2 scale_b = vec2(0.02, 0.02);
uniform float angle_b = 0.0;
uniform vec2 global_scale = vec2(1.0, 1.0);
uniform float scale_multiplier = 1.0;

varying vec2 world_position;
varying vec2 tile_uv;

// Function to rotate UV coordinates by a given angle
vec2 rotateUV(vec2 uv, float angle) {
    float s = sin(angle);
    float c = cos(angle);
    return vec2(c * uv.x - s * uv.y, s * uv.x + c * uv.y);
}

void vertex() {
    world_position = (MODEL_MATRIX * vec4(VERTEX, 1.0, 1.0)).xy;
    tile_uv = UV;
}

void fragment() {
    vec2 combined_scale_r = (scale_r * global_scale) / scale_multiplier;
    vec2 combined_scale_g = (scale_g * global_scale) / scale_multiplier;
    vec2 combined_scale_b = (scale_b * global_scale) / scale_multiplier;

    // Get base color and texture size
    vec4 base_color = texture(TEXTURE, tile_uv);
    vec2 base_tex_size = 1.0 / TEXTURE_PIXEL_SIZE;

    // Pixel-perfect world position snapping
    vec2 snapped_world_pos = floor(world_position * base_tex_size) / base_tex_size;

    // Calculate overlay UVs from world position
    vec2 overlay_uv_r = snapped_world_pos * combined_scale_r;
    vec2 overlay_uv_g = snapped_world_pos * combined_scale_g;
    vec2 overlay_uv_b = snapped_world_pos * combined_scale_b;

    // Apply individual rotations to each overlay UV
    overlay_uv_r = rotateUV(overlay_uv_r, angle_r);
    overlay_uv_g = rotateUV(overlay_uv_g, angle_g);
    overlay_uv_b = rotateUV(overlay_uv_b, angle_b);

    // Snap overlay UVs to texel centers for red texture
    ivec2 red_tex_size_i = textureSize(overlay_tex_red, 0);
    vec2 red_tex_size = vec2(red_tex_size_i);
    overlay_uv_r = (floor(overlay_uv_r * red_tex_size) + 0.5) / red_tex_size;

    // Snap overlay UVs for green texture
    ivec2 green_tex_size_i = textureSize(overlay_tex_green, 0);
    vec2 green_tex_size = vec2(green_tex_size_i);
    overlay_uv_g = (floor(overlay_uv_g * green_tex_size) + 0.5) / green_tex_size;

    // Snap overlay UVs for blue texture
    ivec2 blue_tex_size_i = textureSize(overlay_tex_blue, 0);
    vec2 blue_tex_size = vec2(blue_tex_size_i);
    overlay_uv_b = (floor(overlay_uv_b * blue_tex_size) + 0.5) / blue_tex_size;

    // Now sample the overlay textures
    vec4 overlay_red = texture(overlay_tex_red, overlay_uv_r);
    vec4 overlay_green = texture(overlay_tex_green, overlay_uv_g);
    vec4 overlay_blue = texture(overlay_tex_blue, overlay_uv_b);

    // Strict channel separation
    float mask_r = step(0.9, base_color.r) * (1.0 - step(1.0, base_color.g + base_color.b));
    float mask_g = step(0.9, base_color.g) * (1.0 - step(1.0, base_color.r + base_color.b));
    float mask_b = step(0.9, base_color.b) * (1.0 - step(1.0, base_color.r + base_color.g));

    // Apply overlays with channel masks
    vec4 final_color = base_color;
    final_color = mix(final_color, overlay_red, mask_r);
    final_color = mix(final_color, overlay_green, mask_g);
    final_color = mix(final_color, overlay_blue, mask_b);

    // Alpha handling
    final_color.a *= step(0.5, base_color.a);
    if(final_color.a < 0.01) discard;

    COLOR = final_color;
}

bro used ai for the description and thought we wouldn’t notice 😭
I did use AI, why not? Use AI to your advantage… I used my local deep seek 32b model.