
Multi-Directional Billboard Sprite Shader
Please be sure to read the instructions before use!
Have you ever wanted a shader which you can use for directional sprites? .. Even though there’s already a decent amount of pickings? Well, I sure did too: and for a time for my own personal project, I used a directional shader by a Reddit user by the name of dron1885 (see their post here! https://www.reddit.com/r/godot/comments/13fgdek/shader_only_8_directional_billboarding/ )
However, this shader had a few notable issues: namely, the lack to adjust the amount of animation frames to work with and adjust the amount of angles, no color adjustment and lack of support for asymmetrical directional sprites. Naturally, I did what most people in my position would do: spend a couple hours taking a look at the code to dissect it and add these very features!
—— Features —–
– Adjustable amount of directions (assigned by rows in your spritesheet) and frames (assigned by columns in your spritesheet!)
– A toggle for asymmetrical spritesheets, which can be used to add additional sprites for each side of your sprite’s rotation!
– You can adjust the color of your sprite by adjusting the modulate parameter!
– Frames are able to be adjusted by script and by AnimationPlayer, using the animframe parameter!
– The shader will follow your object’s scale in the same way the standard Godot billboard shader does!
– This shader has support for Y-Billboards, though it’s mainly designed for full billboards by default!
— Instructions —
It’s fairly simple!
1. Apply this shader to a MeshInstance3D with a plane mesh set to the scale you need the sprite to display at and with its orientation facing Z.
2. Add your ShaderMaterial and your shader, and from there enter all that you need! Input your spritesheet and enter the amount of directions and frames your sheet has (for directions, I’d recommend going up and down at increments of 4: by default, the shader uses 8 directions!)
3. Make sure your color/modulate’s I value is set to 0.0. I’m not sure why, but Godot automatically blasts the modulate’s I value up to the maximum but turning it down should get it to function normally.
— Known Issues and Limitations —
Though a good chunk of this has been adjusted to make it as optimal to use as possible, there are 2 issues I’d like to address in the future
– The angle calculations are untouched from the original version of the shader and, from what I’ve seen, they tend to get a bit weird if you’re looking at sprites from a direct top down angle. For most retro first person games, this shouldn’t be an issue though I do want to see if I can adjust the way the angles were calculated from the original shader.
– I need to figure out why the default I value gets blasted up to the maximum value by default if you don’t go out of your way to set the color modulate manually: though it’s nothing gamebreaking, ideally that shouldn’t be an issue.
— Additional Resources —
Due to the fact I don’t want to share assets from my original project I used and adjusted this shader for, provided in the screenshots section are 3 sample sheets for you to test this shader out with. Note that the first two are from pre-existing games so I wouldn’t recommend using them outside of testing and understanding the shader. The third was created with a mix of Blender and Libresprite and uses a model by Itch.io user APirateHat, whose model you can find here: https://apiratehat.itch.io/godot-plushie-3d-character
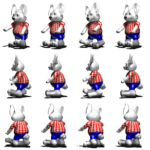
– Rabbit student from Sonic’s Schoolhouse, with 8 directions and 4 frames. Symmetrical
– 1st Prize from Baldi’s Basics, 16 directions with 1 frame. Asymmetrical
– Godot Plushie, 8 directions, 3 frames. Asymmetrical
— Credits —
@dron1885 on Reddit ||| Original version of the shader code this is built off of
Dandy || Implemented animframes, asymmetry, modulate, and the ability to properly scale the amount of directions and frames
tentabrobpy || Helped provide the standard Godot billboard shader code
APirateHat || Created the Godot Plushie model used for the 3rd sample sheet
Shader code
shader_type spatial;
render_mode unshaded, depth_prepass_alpha, depth_draw_opaque;

// rows - directions, column - animation frames
// First (0) row - front
// Last row - back
// Rows inbetween - consecutive rotations

uniform vec4 modulate : source_color = vec4(255,255,255,255);
uniform sampler2D sprite_sheet: filter_nearest;

// Total rows and columns
uniform int directions = 8;
uniform int frames = 4;

uniform int animframe = 0;

uniform bool asymmetrical = false;

uniform bool y_billboard = false;

varying vec3 look_dir;

void vertex() {
	mat4 modified_model_view;
	if (y_billboard){ // Y-Billboard
		modified_model_view = VIEW_MATRIX * mat4(
			vec4(normalize(cross(vec3(0.0, 1.0, 0.0), INV_VIEW_MATRIX[2].xyz)), 0.0),
			vec4(0.0, 1.0, 0.0, 0.0),
			vec4(normalize(cross(MAIN_CAM_INV_VIEW_MATRIX[0].xyz, vec3(0.0, 1.0, 0.0))), 0.0),
			MODEL_MATRIX[3]
		);
	}else{ // Full billboard
		modified_model_view = VIEW_MATRIX * mat4(
			INV_VIEW_MATRIX[0],
			INV_VIEW_MATRIX[1],
			INV_VIEW_MATRIX[2],
			MODEL_MATRIX[3]
		);
	}
    MODELVIEW_MATRIX = modified_model_view * mat4(
	vec4(length(MODEL_MATRIX[0].xyz), 0.0, 0.0, 0.0),
	vec4(0.0, length(MODEL_MATRIX[1].xyz), 0.0, 0.0),
	vec4(0.0, 0.0, length(MODEL_MATRIX[2].xyz), 0.0),
	vec4(0.0, 0.0, 0.0, 1.0));
	// We use pre-billboard quad's NORMAL as the sprite's look_direction
	look_dir = MODELVIEW_NORMAL_MATRIX * NORMAL;
	MODELVIEW_NORMAL_MATRIX = mat3(MODELVIEW_MATRIX);
	// Apply object scale last after other calculations have been run
	MODELVIEW_MATRIX = MODELVIEW_MATRIX * mat4(
	vec4(length(MODEL_MATRIX[0].xyz), 0.0, 0.0, 0.0),
	vec4(0.0, length(MODEL_MATRIX[1].xyz), 0.0, 0.0),
	vec4(0.0, 0.0, length(MODEL_MATRIX[2].xyz), 0.0),
	vec4(0.0, 0.0, 0.0, 1.0));
}


void fragment() {
	float f_directions = float(directions);
	float f_ncolumns = float(frames);
	float f_nrows = float((f_directions / 2.0) + 1.0);
	float inbetweens = f_nrows - 2.0;
	// Simple frame looping
	// Animation frames should be controlled by script/uniform, though a loop is here for those who'd like it
	// float current_frame = trunc(mod(TIME * 5.0, f_ncolumns));

	// cam_dir = CAMERA_DIRECTION_WORLD; is sufficient for orthogonal camera
	vec3 ray_origin = CAMERA_POSITION_WORLD;
    // Instead of calculating object origin, uniform for mesh.global_position wold work better for x/y impostor billboard
	vec3 object_origin = (MODEL_MATRIX * vec4(0.0,0.0,0.0,1.0)).xyz;
	vec3 cam_dir = object_origin - ray_origin;
	cam_dir = normalize((VIEW_MATRIX * vec4(cam_dir, 0.0)).xyz);

	// Getting direction through dot product
	// Assumin that NPC looking at it's positive Z direction
	float angle = 180.0 - degrees(acos(dot(normalize(cam_dir.xz), normalize(look_dir.xz))));
	float _direction = round(angle/180.0 * (f_directions / 2.0));

	// Flipping left/right animations based on cross product
	float flip = sign((look_dir.x * cam_dir.z) - (look_dir.z * cam_dir.x));
	// Here we ignore flipping for "back" and "front" frames
	flip = mix(flip, 1.0, max(step(_direction, 0.0), step(f_nrows - 1.0, _direction)));


	float current_frame = float(animframe);
	// makes sure flip is oriented correctly and plays frames in the correct order if it flips, will ignore if it's asymmetrical though
	if (flip < float(0) && !asymmetrical) {
		current_frame = (current_frame * float(-1)) + f_nrows - (f_ncolumns - 4.0);
	}
	if (asymmetrical) { // Check if the sprite is supposed to be flipped, then set flip to 1 and makes sure the in betweens are done correctly
		if (_direction > float(0) && _direction < f_nrows && flip < float(0)){
			_direction = f_nrows - _direction + inbetweens;
		}
		flip = float(1);
	}else{ // make sure f_directions is set to f_nrows so that way the frame size calculations are set correctly
		f_directions = f_nrows;
	}
	// Getting correct frame
	vec2 frame = vec2(current_frame, _direction);
	vec2 frame_size = vec2(f_ncolumns, f_directions);
	vec4 tex = texture(sprite_sheet, (UV + frame) / frame_size * vec2(flip, 1.0));

	ALBEDO = tex.rgb * modulate.rgb;
	ALPHA =  tex.a * modulate.a;
}
Live Preview


For scaling, you can use the length of each axis from the model matrix. Godot’s standard billboard shader uses this code:
// Billboard Keep Scale: Enabled
MODELVIEW_MATRIX = MODELVIEW_MATRIX * mat4(
vec4(length(MODEL_MATRIX[0].xyz), 0.0, 0.0, 0.0),
vec4(0.0, length(MODEL_MATRIX[1].xyz), 0.0, 0.0),
vec4(0.0, 0.0, length(MODEL_MATRIX[2].xyz), 0.0),
vec4(0.0, 0.0, 0.0, 1.0));
I’m gonna be so real, I didn’t know why I didn’t think to check the shader code for the default billboard shader to get an idea of how it handles the scaling. Thank you for pointing me in the right direction to find that!
P.S: it’s cool to see you stop by here! Your N64-esque sky shader ended up being incredibly useful for the project I also adjusted this shader for as the kind of sky behavior a lot of N64 titles had happened to line up with a lot of the old PC titles I’ve been drawing inspiration from, so I figured this would be a good time to thank you for that resource. Best wishes to you! ^^
I’m glad you found that one useful, it’s very gratifying to be able to contribute to the community 😸
Small update, 5/31/2026: I ended up making a Github repo compiling both this shader and the shaders I’ve been using for that aforementioned personal project into a small sample project with some stock and sample assets to work with. I mainly did that since at the moment, I’m trying to solve some extra issues unrelated to this specific shader but I reckoned it’d be good to give back. Both the sample directional spritesheet from that pack and the Github repo will be linked on the page in due time!