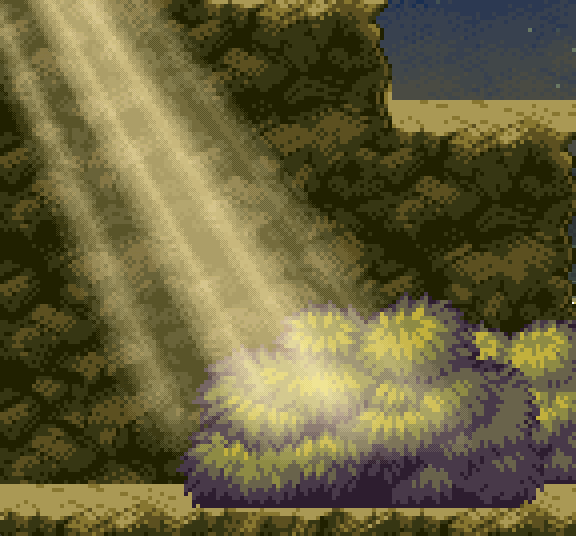
Pixelated God Rays+
Shader modified from:
https://godotshaders.com/shader/god-rays-2d-godot-v4-4-1/
https://godotshaders.com/shader/pixelated-god-rays/
https://godotshaders.com/shader/god-rays/
I really like these pixelated God Rays, but the above versions of God Rays all had a very jarring boundary line appearing in the light, this version uses a seamless noise texture to fix that. And I changed the logic in the pixelation part, now you can specify the size of the pixel blocks more intuitively.
Below is a more detailed explanation of the shader changes:
- By using hint_enum, it is now possible to change the mixing mode more intuitively.
- Changed the noise source to a noise texture that needs to be set externally, as long as this noise texture is seamless, no boundary lines will appear in god ray, recommend using Godot’s built-in NoiseTexture2D resource directly.
- You may need to crank up the noise resource property noiseTex/noise/frequency.
- And don’t forget to check that seamless property of the noise resource.
- Added pixelSizeScale property to change the pixel block size.
- Pixelation now automatically adapts the aspect ratio of the texture.
- This shader needs actual texture resources to work, which means you shouldn’t use it on a ColorRect, but more on a Sprite2D or TextureRect.
- If you want to conveniently set the size of your texture resource, recommend using GradientTexture2D or NoiseTexture2D.
I’m still a newbie when it comes to shaders, so if there’s a part where you have a better implementation, you’re more than welcome to continue improving this shader.
中文说明:
我真的很喜欢这些像素化God Ray的效果,但是以上版本的God Ray都有一条非常突兀的边界线出现在灯光里,这个版本使用了一个seamless的噪波贴图来解决这个问题。并且我更改了像素化部分的逻辑,现在你可以更直观的指定像素块的大小。
以下是更详细的着色器变动解释:
- 通过使用hint_enum,现在可以更直观的选择混合模式了。
- 把噪波来源改为了一个需要从外部设置的噪波贴图,只要这个噪波贴图是无缝衔接的,god ray里就不会有分界线出现,推荐直接使用Godot内置的NoiseTexture2D。
- 如果你使用了NoiseTexture2D,需要把noiseTex里noise的frequency属性调高(默认的值太小了,无法产生足够多的光束数量)。
- 如果你使用了NoiseTexture2D,不要忘记勾选seamless属性。
- 增加了pixelSizeScale用来调整像素块大小。
- 像素化现在自动适配纹理长宽比。
- 这个着色器需要实际的纹理资源来显示, 这也意味着你不应该把它用在一个ColorRect上,而是应该用在 Sprite2D或TextureRect上面。
- 如果你想要边界的调整纹理资源的尺寸, 推荐使用GradientTexture2D或NoiseTexture2D。
在着色器方面我还是个新手,如果某个部分你有更好的实现方法,非常欢迎大家继续改进这个着色器。
Shader code
/*
Pixelated God Rays Shader
Modified from Godot Shaders - godotshaders.com/shader/god-rays
& godotshaders.com/shader/god-rays-2d-godot-v4-4-1/

pixelation effects for retro/pixel art aesthetic

By using hint_enum, it is now possible to change the mixing mode intuitively

Changed noise source to a noise texture for seamless god ray
You may need to crank up the noise resource property noiseTex/noise/frequency to around 0.5
And don't forget to check that seamless property of the noise resource

Added pixelSizeScale property to change the pixel block size
Pixelation now automatically adapts the aspect ratio of the texture
This shader needs actual texture resources to work, which means you shouldn't use it on a ColorRect, but more on a Sprite2D or TextureRect
If you want to conveniently set the size of your texture resource, recommend using GradientTexture2D or NoiseTexture2D
*/
shader_type canvas_item;
render_mode unshaded;

// New uniform for blend mode selection.
uniform int blend_mode : hint_enum
("Screen:0", "Hard Light:1", "Soft Light:2", "Clamp:3", "Negative:4", "Multiply:5","Darken:6", "Lighten:7", "Difference:8","Exclusion:9") = 0;
uniform sampler2D noiseTex;

uniform float angle = -0.3;
uniform float position = -0.2;
uniform float spread : hint_range(0.0, 1.0) = 0.5;
uniform float cutoff : hint_range(-1.0, 1.0) = 0.1;
uniform float falloff : hint_range(0.0, 1.0) = 0.2;
uniform float edge_fade : hint_range(0.0, 1.0) = 0.15;
uniform float speed = 1.0;
uniform float ray1_density = 8.0;
uniform float ray2_density = 30.0;
uniform float ray2_intensity : hint_range(0.0, 1.0) = 0.3;
uniform vec4 ray_color : source_color = vec4(1.0, 0.9, 0.65, 0.8);
uniform bool hdr = false;
uniform float seed = 5.0;

// Pixelation parameters
uniform float pixelSizeScale : hint_range(1.0, 16.0) = 1.0;
uniform bool quantize_colors = true;
uniform int color_levels : hint_range(2, 16) = 4;
uniform bool dither = false;
uniform float dither_strength : hint_range(0.0, 1.0) = 0.5;
uniform float opacity : hint_range(0.0, 1.0) = 1.0;

// Backward compatibility
uniform sampler2D SCREEN_TEXTURE : hint_screen_texture, filter_linear_mipmap;

float noise(in vec2 uv) {
    vec2 i = floor(uv);
    vec2 f = fract(uv);

    vec2 texSize = vec2(textureSize(noiseTex, 0));

    vec2 uvA = (i + vec2(0.5)) / texSize;
    vec2 uvB = (i + vec2(1.5, 0.5)) / texSize;
    vec2 uvC = (i + vec2(0.5, 1.5)) / texSize;
    vec2 uvD = (i + vec2(1.5, 1.5)) / texSize;

    float a = texture(noiseTex, uvA).r;
    float b = texture(noiseTex, uvB).r;
    float c = texture(noiseTex, uvC).r;
    float d = texture(noiseTex, uvD).r;

    vec2 u = f * f * (3.0 - 2.0 * f);

    return mix(a, b, u.x) +
           (c - a) * u.y * (1.0 - u.x) +
           (d - b) * u.x * u.y;
}

mat2 rotate(float _angle){
    return mat2(vec2(cos(_angle), -sin(_angle)), vec2(sin(_angle), cos(_angle)));
}

//–– Blend mode functions ––

// Screen blend mode.
vec3 blend_screen(vec3 base, vec3 blend) {
    return 1.0 - (1.0 - base) * (1.0 - blend);
}

// Hard light blend mode.
vec3 blend_hard_light(vec3 base, vec3 blend) {
    return mix(2.0 * base * blend, 1.0 - 2.0 * (1.0 - base) * (1.0 - blend), step(0.5, blend));
}

// Soft light blend mode.
vec3 blend_soft_light(vec3 base, vec3 blend) {
    vec3 result;
    result.r = (blend.r < 0.5)
         ? (2.0 * base.r * blend.r + base.r * base.r * (1.0 - 2.0 * blend.r))
         : (sqrt(base.r) * (2.0 * blend.r - 1.0) + 2.0 * base.r * (1.0 - blend.r));
    result.g = (blend.g < 0.5)
         ? (2.0 * base.g * blend.g + base.g * base.g * (1.0 - 2.0 * blend.g))
         : (sqrt(base.g) * (2.0 * blend.g - 1.0) + 2.0 * base.g * (1.0 - blend.g));
    result.b = (blend.b < 0.5)
         ? (2.0 * base.b * blend.b + base.b * base.b * (1.0 - 2.0 * blend.b))
         : (sqrt(base.b) * (2.0 * blend.b - 1.0) + 2.0 * base.b * (1.0 - blend.b));
    return result;
}

// Clamp blend mode: simply clamps the base color.
vec3 blend_clamp(vec3 base, vec3 blend) {
    return clamp(base, 0.0, 1.0);
}

// Negative blend mode: inverts the base color.
vec3 blend_negative(vec3 base, vec3 blend) {
    return 1.0 - base;
}

// Multiply blend mode.
vec3 blend_multiply(vec3 base, vec3 blend) {
    return base * blend;
}

// Darken blend mode: takes the minimum channel value.
vec3 blend_darken(vec3 base, vec3 blend) {
    return min(base, blend);
}

// Lighten blend mode: takes the maximum channel value.
vec3 blend_lighten(vec3 base, vec3 blend) {
    return max(base, blend);
}

// Difference blend mode: absolute difference.
vec3 blend_difference(vec3 base, vec3 blend) {
    return abs(base - blend);
}

// Exclusion blend mode.
vec3 blend_exclusion(vec3 base, vec3 blend) {
    return base + blend - 2.0 * base * blend;
}

// Pixelation function
vec2 pixelate_uv(vec2 uv, vec2 pixelation_size) {
    vec2 pixel_uv = floor(uv / pixelation_size) * pixelation_size;
    return pixel_uv;
}

// Color quantization function
vec3 quantize_color(vec3 input_color, int levels) {
    return floor(input_color * float(levels)) / float(levels);
}

// Simple dithering pattern
float dither_pattern(vec2 uv) {
    vec2 grid = floor(uv * 4.0);
    return mod(grid.x + grid.y, 2.0);
}

void fragment()
{
    // Pixelate the UV coordinates
    vec2 pixelated_uv = pixelate_uv(UV, TEXTURE_PIXEL_SIZE * pixelSizeScale);
    vec2 screen_pixelated_uv = pixelate_uv(SCREEN_UV, SCREEN_PIXEL_SIZE * pixelSizeScale);

    // Use pixelated UVs for the god rays calculation
    vec2 transformed_uv = (rotate(angle) * (pixelated_uv - position)) / ((pixelated_uv.y + spread) - (pixelated_uv.y * spread));

    // Animate the ray according to the new transformed UVs
    vec2 ray1 = vec2(transformed_uv.x * ray1_density + sin(TIME * 0.1 * speed) * (ray1_density * 0.2) + seed, 1.0);
    vec2 ray2 = vec2(transformed_uv.x * ray2_density + sin(TIME * 0.2 * speed) * (ray1_density * 0.2) + seed, 1.0);

    // Cut off the ray's edges
    float cut = step(cutoff, transformed_uv.x) * step(cutoff, 1.0 - transformed_uv.x);
    ray1 *= cut;
    ray2 *= cut;

    // Apply the noise pattern (i.e. create the rays)
    float rays;
    if (hdr){
        // This is not really HDR, but check this to not clamp the two merged rays making
        // their values go over 1.0. Can make for some nice effect
        rays = noise(ray1) + (noise(ray2) * ray2_intensity);
    }
    else{
        rays = clamp(noise(ray1) + (noise(ray2) * ray2_intensity), 0., 1.);
    }

    // Fade out edges using pixelated UV
    rays *= smoothstep(0.0, falloff, (1.0 - pixelated_uv.y)); // Bottom
    rays *= smoothstep(0.0 + cutoff, edge_fade + cutoff, transformed_uv.x); // Left
    rays *= smoothstep(0.0 + cutoff, edge_fade + cutoff, 1.0 - transformed_uv.x); // Right

    // Apply dithering if enabled
    if (dither) {
        float dither_noise = dither_pattern(UV / TEXTURE_PIXEL_SIZE) * dither_strength;
        rays += (dither_noise - 0.5) * 0.1;
        rays = clamp(rays, 0.0, 1.0);
    }

    // Color to the rays
    vec3 shine = vec3(rays) * ray_color.rgb;

    // Quantize colors if enabled
    if (quantize_colors) {
        shine = quantize_color(shine, color_levels);
    }

    // Try different blending modes for a nicer effect. "Screen" is included in the code,
    // but take a look at https://godotshaders.com/snippet/blending-modes/ for more.
    // With "Screen" blend mode using pixelated screen texture:
    vec4 screen_color = texture(SCREEN_TEXTURE, screen_pixelated_uv);
    if (quantize_colors) {
        screen_color.rgb = quantize_color(screen_color.rgb, color_levels);
    }

	// Select blend mode based on uniform blend_mode.
	vec3 screen_col = screen_color.rgb;
    vec3 blended;
    if (blend_mode == 0) {
        blended = blend_screen(screen_col, ray_color.rgb);
    } else if (blend_mode == 1) {
        blended = blend_hard_light(screen_col, ray_color.rgb);
    } else if (blend_mode == 2) {
        blended = blend_soft_light(screen_col, ray_color.rgb);
    } else if (blend_mode == 3) {
        blended = blend_clamp(screen_col, ray_color.rgb);
    } else if (blend_mode == 4) {
        blended = blend_negative(screen_col, ray_color.rgb);
    } else if (blend_mode == 5) {
        blended = blend_multiply(screen_col, ray_color.rgb);
    } else if (blend_mode == 6) {
        blended = blend_darken(screen_col, ray_color.rgb);
    } else if (blend_mode == 7) {
        blended = blend_lighten(screen_col, ray_color.rgb);
    } else if (blend_mode == 8) {
        blended = blend_difference(screen_col, ray_color.rgb);
    } else if (blend_mode == 9) {
        blended = blend_exclusion(screen_col, ray_color.rgb);
    } else {
        blended = screen_col;
    }

    shine = blended;

    float final_alpha = rays * ray_color.a;
    if (quantize_colors) {
        final_alpha = floor(final_alpha * float(color_levels)) / float(color_levels);
    }
    final_alpha *= opacity;

    COLOR = vec4(shine, final_alpha);
}
Live Preview


This is really cool,thank you for your effort.
One question- I see in the image an effect of multiple rays, but when applying the shader in game it gives only one that kind of looks like a spotlight (bright in the center and tapers in the edges). How do i make it have multiple rays like in your picture?
您可以通过调整 noiseTex/noise/frequency、shader_parameter/ray2_density(值越高创建更多层)和 shader_parameter/ray2_intensity(值越高使光边界更清晰)来实现多个光线。