Custom 2D Light
This is a light weight solution for a custom light 2d class which is a much more efficient approach if you goal is to maximize performance or get rid of unnecesary things like extra complex calculations or shadows.
The shader can be applied to canvas items
Parameters explained:
light color: used to set the color of the light (rgb, (255, 255, 255) is default for white)
brightness: set the brightness of the light
attenuation strength: used to make darker spots less iluminated the lighter spots, a number between 0.0 and 1.0 defines its strngth (needed to created a similar or even better effect then default light 2d classes)
intensity: set the intensity of the light
max brightness : this parameter controls how bright overlapping lights or the light itself can get
Shader code
shader_type canvas_item;
uniform sampler2D SCREEN_TEXTURE : hint_screen_texture, repeat_disable, filter_nearest;
render_mode blend_add, unshaded;
uniform sampler2D light_texture;
uniform vec3 light_color = vec3(255, 255, 255); // Default to white
uniform float brightness : hint_range(0.0, 1.0) = 0.5;
uniform float attenuation_strength : hint_range(0.0, 1.0) = 0.5;
uniform float intensity : hint_range(0.0, 10.0) = 1.0;
uniform float max_brightness : hint_range(0.0, 10.0) = 1.0; // Maximum allowable brightness
void fragment() {
// Sample the light texture at the current UV coordinates
vec4 light_tex_color = texture(light_texture, UV);
// Sample the underlying texture color
vec4 under_color = texture(SCREEN_TEXTURE, SCREEN_UV);
// Normalize the light color from 0-255 to 0.0-1.0
vec3 normalized_light_color = light_color / 255.0;
// Calculate the brightness of the underlying pixel (using the luminance formula)
float under_brightness = dot(under_color.rgb, vec3(0.299, 0.587, 0.114));
// Adjust the final color by modulating the light texture with brightness,
// light color, and the brightness of the underlying pixel
float attenuation = mix(1.0, under_brightness, attenuation_strength);
vec4 final_color = light_tex_color * attenuation * vec4(normalized_light_color, 1.0) * brightness * intensity;
// Clamp the resulting color to ensure it does not exceed the max_brightness
float max_rgb = max_brightness;
vec3 clamped_color = min(final_color.rgb, vec3(max_rgb));
// Use additive blending with the background
COLOR = vec4(clamped_color, light_tex_color.a);
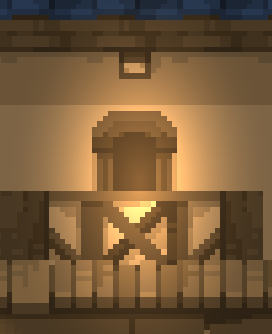
}Live Preview


cool
Is it possible to make this shader produce better results in very dark environments?
i already achieved better results with it instead of default light2d instances when i was working with lighting in a dark cave environment. With some tweaking you can achieve a realy good ilumination effect in dark evironments. So yes it definetly is. You can for example lower the attenuation_strength parameter which determines the ilumination strength of darker spots (simple explanation tho) and play around with the brightness and intensity parameters
Thank you for your reply! I’ve tried this shader several times and found that it works well if I apply it to small objects like colored light bulbs. But if I try to use it to light up the environment, it doesn’t work so well. The player inside the light seems to be covered by a mask and not transparent enough like Light2D. For my situation, I currently use Light2D with a large texture for the parts that need to be illuminated, and then use this shader to add small lights to the scene.
If I’m doing something wrong and this shader can be used to light up the whole environment, please let me know. Thank you very much, I love this shader.
The creator of the shader here.
You are totaly right. While this shader has a ton of use cases it has limitations and is rather be used for light effects than lighting a whole scene or big parts of this scene (it is possible tho and work but not recomended as static light2d nodes are more powerfull in such a scenario).
A good example are fireflys. If you animate them with the shader the whole firefly system runs much much smoother than with default light2d instances. Or if you use it for glowing crystals in a dark cave it also has advantages and so on. you get the point.
I intended it to act as an replacement for cases where i need cool light effects or cool static lights like iluminated windows without the loss of performance.
If you want to use this shader more often or in instances that overlapp i recomend to put them into a BackBufferCoppy instance with “Viewport” or “Rect” mode (improves ilumination or/and helps with performance)
Thank you very much! I replaced most of the small lights in the game scene with this shader, and now the light rendering part takes only 0.3 milliseconds per frame, which is a huge performance improvement. I’m still new to Godot, so I never knew BackBufferCopy could be used anywhere other than the tutorial shader overlap, I’ll give it a try.
In some environments this shader can cause bugs (i dont know why but in some cases it makes the background shine trough..looks realy weird) Placing it inside of a BackbufferCoppy fixes this issue
Glad you are not impacted by that bug
Have fun, Godot is a realy great and powerfull game engine
Yeah I had this problem but it’s ok. FYI I found a shader that works well in dark environments, hope you don’t mind me adding the link here because I know a lot of people are stuck with this problem.
For those who are bothered by Light2D’s 16 limit and the terrible Sprite2D+Add blending mode in dark environments, I found a simple but excellent shader. Please try it. Light shader – Godot Shaders