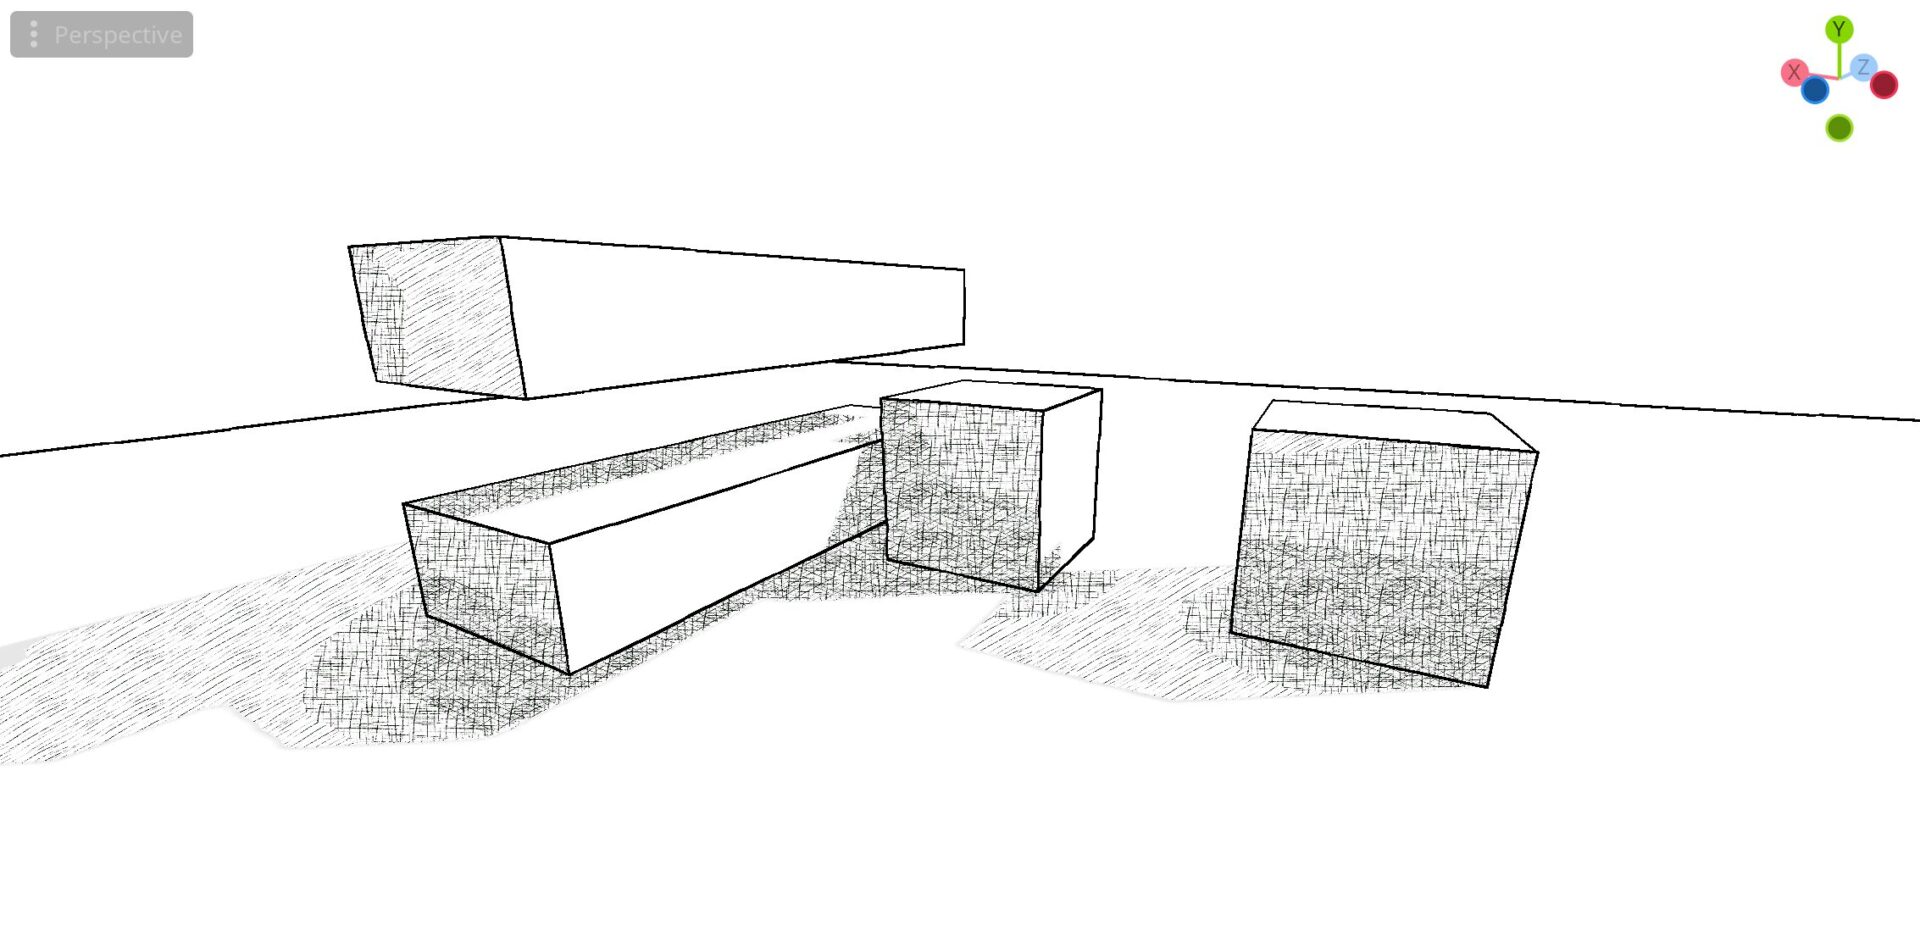
Mobius Outline + Hatching
I saw tlaverne covered this already and this is my version.
Original Video:Moebius-style 3D Rendering | Useless Game Dev – YouTube
Shader code
shader_type spatial;
render_mode unshaded,vertex_lighting;

uniform sampler2D depth_texture : hint_depth_texture,filter_linear_mipmap;
uniform sampler2D normal_texture : hint_normal_roughness_texture,filter_linear_mipmap;
uniform sampler2D screen_texture: hint_screen_texture,filter_linear_mipmap;


uniform vec3 edge_color : source_color = vec3(0.0, 0.0, 0.0);
uniform float edge_threshold: hint_range(0.001, 0.2, 0.001) = 0.01;

uniform sampler2D hatch1: filter_nearest,repeat_enable;
uniform sampler2D hatch2: filter_nearest,repeat_enable;
uniform sampler2D hatch3: filter_nearest,repeat_enable;


uniform float noise_frequency : hint_range(0.1, 20.0, 0.1)= 10.0 ;
uniform float noise_offset_intensity : hint_range(0.0, 0.2, 0.001) = 0.002;


vec2 hash(vec2 p) {
    p = vec2(dot(p, vec2(127.1, 311.7)),
             dot(p, vec2(269.5, 183.3)));
    return -1.0 + 2.0 * fract(sin(p) * 43758.5453123);
}

vec2 fade(vec2 t) {
    return t * t * t * (t * (t * 6.0 - 15.0) + 10.0);
}

float grad(vec2 hash, vec2 dir) {
    vec2 grad_dir = vec2(hash.x * 2.0 - 1.0, hash.y * 2.0 - 1.0);
    return dot(grad_dir, dir);
}

float perlin(vec2 pos) {
    vec2 p = floor(pos);
    vec2 f = fract(pos);

    f = fade(f);

    vec2 top_left = p;
    vec2 top_right = p + vec2(1.0, 0.0);
    vec2 bottom_left = p + vec2(0.0, 1.0);
    vec2 bottom_right = p + vec2(1.0, 1.0);

    float tl = grad(hash(top_left), f);
    float tr = grad(hash(top_right), f - vec2(1.0, 0.0));
    float bl = grad(hash(bottom_left), f - vec2(0.0, 1.0));
    float br = grad(hash(bottom_right), f - vec2(1.0, 1.0));

    float top = mix(tl, tr, f.x);
    float bottom = mix(bl, br, f.x);
    return mix(top, bottom, f.y);
}


void vertex(){

	POSITION = vec4(VERTEX.xy,1.0,1.0);
}

void fragment() {
	vec2 screen_uv = SCREEN_UV;
	vec3 origin_color = texture(screen_texture,screen_uv).rgb;

    // 获取当前位置的Perlin噪声值
    vec2 noiseValue = vec2(perlin(screen_uv * noise_frequency), perlin((screen_uv + vec2(0.5, 0.5)) * noise_frequency));  // 10.0是频率,可以调整

    // 使用噪声值偏移uv
    vec2 uv = screen_uv + noiseValue * noise_offset_intensity;  // 0.02是偏移强度,可以根据需要调整
	float dx = 1.0 / VIEWPORT_SIZE.x;
	float dy = 1.0 / VIEWPORT_SIZE.y;
	mat3 Gx = mat3(
				vec3(-1, -2, -1),
				vec3( 0,  0,  0),
				vec3( 1,  2,  1)
	);

	mat3 Gy = mat3(
			vec3(-1, 0, 1),
			vec3(-2, 0, 2),
			vec3(-1, 0, 1)
	);

    float depthSobelX = 0.0;
    float depthSobelY = 0.0;

    float normalSobelX = 0.0;
    float normalSobelY = 0.0;

    for(int i = -1; i <= 1; i++) {
        for(int j = -1; j <= 1; j++) {
			float depth = texture(depth_texture, uv + vec2(float(i) * dx, float(j) * dy)).r;
			vec3 normal = normalize(texture(normal_texture, uv + vec2(float(i) * dx, float(j) * dy)).rgb * 2.0 - 1.0);
			depthSobelX += Gx[i+1][j+1] * depth;
			depthSobelY += Gy[i+1][j+1] * depth;
			normalSobelX += Gx[i+1][j+1] * normal.x;
			normalSobelY += Gy[i+1][j+1] * normal.y;
        }
    }

    float depthMagnitude = length(vec2(depthSobelX, depthSobelY));
    float normalMagnitude = length(vec2(normalSobelX, normalSobelY));

    // Combine the results
    float magnitude = depthMagnitude + normalMagnitude;


	// distort the hatching
	vec3 normal_sample = normalize(texture(normal_texture, uv).rgb * 2.0 - 1.0);
	vec2 distorted_uv = uv + normal_sample.xy * 2.0 ;


	vec3 screen_color = texture(screen_texture,uv).rgb;
	float luminance = dot(screen_color, vec3(0.299, 0.587, 0.114));

	vec4 texture_color;
	if (luminance < 0.6){
		texture_color = texture(hatch3,distorted_uv * 20.0);

	}
	else if (luminance < 0.7){
		texture_color = texture(hatch2,distorted_uv * 20.0);
	}
	else if (luminance < 0.8){
		texture_color = texture(hatch1,distorted_uv * 20.0);
	}
	else{
		texture_color = texture(screen_texture,uv);
	}
    if (magnitude > edge_threshold) {
        ALBEDO = edge_color;
    } else {
        // 使用纹理颜色
        ALBEDO = texture_color.rgb;
    }

}
Live Preview

Thank you very much, it looks great on the pictures! but it doesn’t work for me, im applying it to a quad in front of the 3d camera but I can’t seem to increase the outline thickness and would like to know how to set up the hatches, please. And thank you
what’s your Godot Version? is it 4.3?
thank you, worked as expected. do you have any tips how to make the white surface of the hatches transparent? in that way, you can use the original colors of the object. thanks.
If you still need it, or anyone else stumbles across this, sinply comment out the hatch texture defenitions and the three if statements that use them, just leaving the last else case `texture_color = texture(screen_texture,uv) and you should get just the outline without whiteout
Could you please upload a sample project? I think it would be really helpful for all the folks who cannot get this to work properly for one reason or another! In any case, thank you for sharing this.
Have you tried this in Godot 4.4? I can’t seem to get the other demo, or this one to display anything really. Great work though, thanks for sharing
This worked for me: create a MeshInstance3D as a child of your camera at distance of z = -1. Then create a “New QuadMesh” with size=2, and [x] Flip Faces. And, of course, use this shader as a material on that quad.